


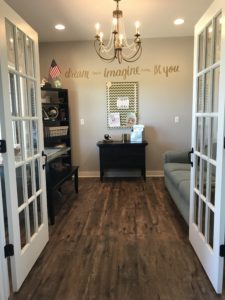
Welcome to our Homeschool Room!
As you may or may not know, homeschooling can be… well, messy! Though it appears beautiful and magazine worthy on Pinterest and even in some of these photos, don’t be deceived. It can be pure chaos. If you have ever tried juggling cleaning, cooking, laundering, taking care of other children too young for school, in addition, to the actual educating part of homeschooling you know very well how messy the environment within the home can get.
If you are anything like me, then you thrive on order and organization and feel completely scattered and distracted in the midst of disorder. Squirrel!!
***Let me make a side-note and salute all moms that can stay focused and on task when things aren’t perfectly in order. You amaze me! I truly believe women like you are to be admired. It can be a flaw to constantly want order and is a distraction away from the more important things in life. So I salute you fellow mama!! Keep doing what you are doing.
If you do however, crave order, let me show you how I keep it simple so that it’s easy to keep tidy and you aren’t constantly distracted with trying to clean.
First things first, repeat after me, “Less is more”… altogether now, “Less is more”, third time’s a charm, “Less is more”. Okay now that we have that down. Let me explain. We recently moved into a new home. In our last home we did school in our dining room and we had beautiful floor to ceiling custom built-in cabinets where I stored ALL MY THINGS. All the things I “needed” in order to homeschool. As an avid garage saler, you can imagine I had a few A TON OF THINGS.
Fast forward to our newly built home. During the design phase, we opted out of the formal dining room and decided to make an actual schoolroom. However, when building a house, money runs out! If you have built one, you know what I mean. So the intended floor to ceiling built-ins that were on the top of my list, got overruled by some more necessary things like toilets and doorknobs. Fair enough (I guess). While unpacking the homeschool stuff I realized I had ridiculous amounts of stuff and nowhere to put it in the school room, so it was time to get creative on a budget (because remember, we had just finished building and I was in no mood to spend more $$)! Here is what I did:
Tip #1: PURGE
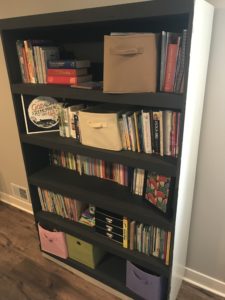
I purged! I got rid of a lot of stuff and shelfed the other things that I do not currently use, but might use eventually (like that Latin Curriculum that I bought with every good intention when the kids were 4 and 3… I will use it one day or should I say one ‘diem’). Note: I have a large bookcase in the rec room that houses books like these and all our books! I call it my mini-library. This is not in the actual homeschool room.
Tip #2: Only keep the items in your homeschool room that you use every single day
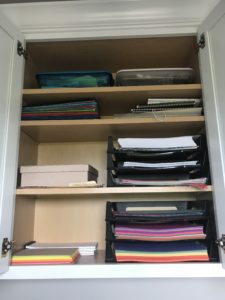
What do I mean? It’s tempting to keep paint and science kits, 62 shades of colored construction paper, and 1,273 pieces of broken crayons in your area. But if you only use them every so often, I recommend keeping them in another area aka “supply closet” of sorts. (If you don’t use them at all, see Tip #1). Here is where I keep construction paper, extra notebooks, flashcards, etc. This is across the house in our home office.
Now for the actual homeschool room:
Tip #3: Find a Small Table/Desk with Drawers similar to this one
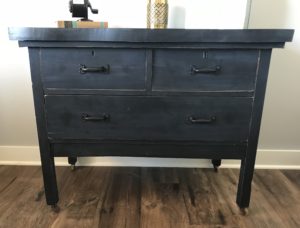
Antique tables and desks are a great option to add character to the space. If you are working on a budget, check out your local Salvation Army, Habitat For Humanity ReStore, or a garage sale for a cool piece of furniture to paint and repurpose. I love rescuing old things!
In here I house the “not so pretty homeschooling items”.
I use one drawer for basic office supplies (hole punch, tape roll and hot glue gun), and the second drawer is a where the kids turn in their notebooking pages which later get compiled into a binder. I also keep the plethora of color pencils in here so they can use them while notebooking.
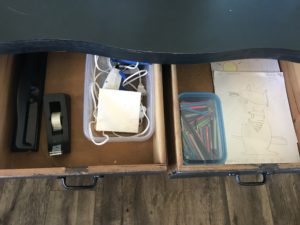
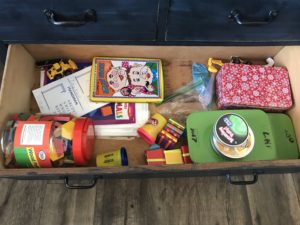
The third and bottom large drawer is used for something I call “Quiet Time Toys”. This where the kids go to in order to find something to keep their hands busy during read aloud time. We love reading books aloud and I find that they stay more focused if their hands are busy with something. Some of the items I keep in there are shape blocks, a magnetic face game, kinetic sand, slime, putty, Wiki Stix (these are so cool), and play-dough.
Tip #4: Shelves, Baskets and Cute Decor
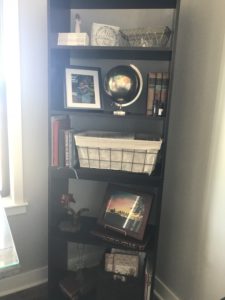
So, as you know, I was desperate and tired of spending money upon moving in. But I also wanted so badly to organize my stuff! So what does a girl do in a desperate situation on a low budget? Duh, she runs to Target! I put on my blinders to avoid being sucked into the Target vortex, b-lined to the furniture section and I picked up this fancy (not fancy) bookcase. I came home, assembled it myself (hubby was out of town) and proudly stood it up. I was proud of my masterpiece… that was until I leaned on it. I will warn you, if you ever find yourself in my schoolroom, DON’T LEAN ON THE BOOKCASE. It has quite the wobble!
Though it’s not at all sturdy, it serves its purpose. Maybe one day I will upgrade… but for now, look don’t touch. I then rummaged through my collection of baskets and bins and found two that were cute and also served to hide some more messy-looking stuff that we use daily.
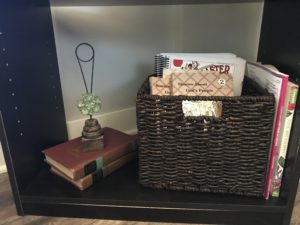
Basket #1: Houses all of my teacher manuals, as well as, my awesome Homeschool Planner that I love. Next to it, I neatly line up 3 of my daughters favorite coloring books (another activity she loves to do during Read Aloud Time). Note: I made her choose only 3!! She has approximately 47 coloring books, I had to remind her: less is more kiddo!
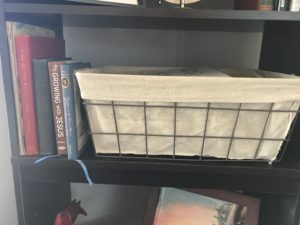
Basket #2: This larger, still very stylish, basket houses the not so “modern farmhouse decor” math manipulatives and science-y stuff. They are bright primary colors and don’t go with the feel I was going for in the room. So they needed to be hidden. This fabric lined basket, hides them well and they are still easy to grab because we use them often.
Note: Next to that I keep some special books including: a devotional, as well as, our current and upcoming Read-Aloud books.
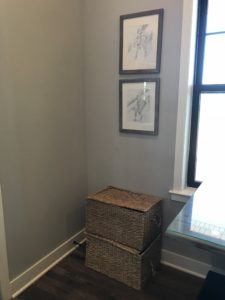
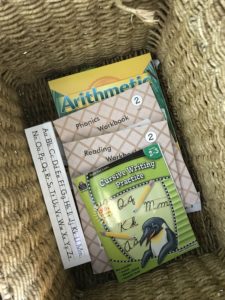
I also keep two large baskets with lids on them stacked in another corner. I LOVE the way it looks in the room and that is where ALL of the kids school books are stored. They each have their own bin. Right now it is summer so they are kind of empty, but come fall they will be full again. It also makes it easier for the kids to clean up, since they only have to literally throw it all in one bin and close the lid. Less work for me because it is easy on them which means they will actually do it!
Tip #5: Opt for Multi-Functional Furniture
Choose a Kitchen Table instead of desks: Now, many of you probably already do this. But this is for the mom who doesn’t yet know what “home”-schooling can look like. When I started homeschooling… I had no idea that our homeschool room did not have to be an exact clone of the traditional classroom I grew up in. Not only does a table promote teamwork because the kids have to share it, it also makes the room multi-function. When we host holiday parties, this school room doubles as more entertaining space. Win-win!
Choose a sofa bed instead of just a couch: First of all can I just say, all homeschools need a couch (a living room couch will do… just don’t be afraid to let school overflow onto the couch)! Again I will never forget the first day I did “school” with the kids. They were in preschool and I spent all types of time and energy getting the “classroom” ready. It was complete with a full size chalkboard, American flag, a teacher’s reading chair and a circle rug for the kids to sit on during storytime. Well about 2 pages into our first “formal” storytime session, both kids were cuddled up on my lap. Duh!? What was I thinking? I am their mom! From then on out storytime took place on the couch.
So in our new home we were able to fit a couch right in the school room and it is also a sofa bed. That way when guests stay over it doubles as a guest room!! Ta-da!!
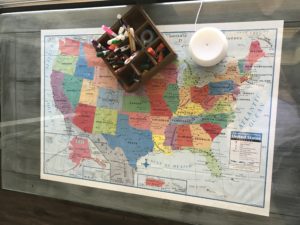
Tip #6: Maps!! Don’t hide them, use them as decoration!

We have a map of the US under a piece of glass on our table and also a very large map of the world on our wall. Both add really cool charm to the space.
Tip #7: Find a fun writing utensil caddy
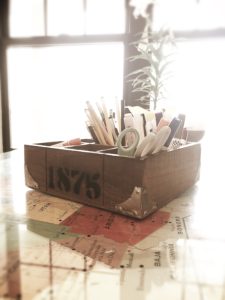 These are all the rage these days. They are at Target and all over, but if you keep an eye open, you might be able snag one at a garage sale for $2 like I did. I love this 9 section wooden caddy. It is a perfect divider for all our different writing utensils… though we are still ALWAYS searching for regular pencils!!? Seriously, I think someone breaks in a steals them in the night! Anyone else feel my pain??
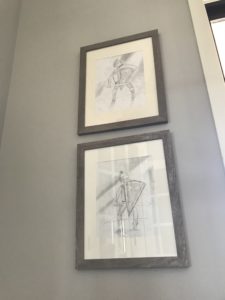
Tip #8: Frame the really good Artwork
So I am a far cry from an artist. I am not awesome at teaching the kids, though I have tried and still do it to some extent. However, I want them to have a richer experience, so once a month they go to an amazing art class and come home with frame-worthy artwork. Their teacher is amazing!
Anyway, whether you teach them at home or not, framing the really good pieces makes the kids feel proud (as they should) and adds simple wall decor in the room. You don’t need to add a new frame for every piece. Simply add the newest piece in front and store the older pieces in back of the frame.
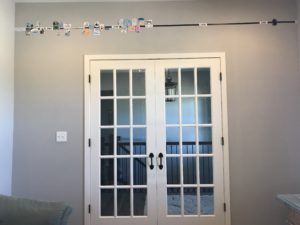
Tip #9: Hide the less visually appealing items on the least visible wall
We love homeschooling our kids, but we don’t want our home to look like a school. Does that makes sense?? Part of our curriculum is making and building this really AWESOME and really long timeline. While it is a great visual and learning tool, it does not fall into the category modern farmhouse decor that I love so much. SO I hide it so that it is only visible when standing in the room. See?
You can do this for alphabet charts, math posters, or whatever it is that you like to have visually available, but don’t want to be the focal point of the room.
So there you have it. those are my 9 tips for organizing a homeschool room with no closets or built-in storage. As you can see, with a little creativity, it is totally possible! If you have any questions, about any parts of the room I shared with you send me an email: allison@allisonpowers.com. I would LOVE to chat more!
Have an organizing issue that you are struggling to resolve?? Message me and I would love to help you brainstorm a solution. Organizing is my jam!
xoxo


Awsome. Im looking forward to more homeschool blogs. I’m strongly considering homeschooling my 3 year old for kindergarten. I have not been happy with traditional school structure. I have a 2nd grader that im considering making this his last year in a traditional school setting as well.
Stay tuned for more! If you have and specific questions, send me a message! I love encouraging and chit chatting! KDG and Elementary school are so fun I say go for it! I promise you won’t “ruin” as many moms think and they will be richly blessed by the experience and so will you 😉
I don’t homeschool…I’m not brave enough. But great tips in general to organize the kid’s stuff!
Isn t it funny how we have the norms that we think have to be or else, when really, we are in control and can make out of the norm decisions when need be!